Season Tickets
Setting up Season Subscriptions - Fixed Event Subscriptions
NOTE: Season Subscriptions always require a seating chart to exist.
However if season subscriptions/packages are being sold for general admission events (rather than reserved seating events) where a seating chart has not previously been installed in your database, a simple seating chart(s) for the venue(s) where the events are being held can be created for you.
Please contact InterTicket customer service if you require this.
If you already have a subscription in place for your current season and wish to "roll over" all existing subscription to your next season, see the procedure at Season Ticket "Rollover".
The first step in setting up a new season subscription is to check you have correctly identified all the events to be included in your season subscriptions.
Go to Maintenance > Events, highlight an event name you want to be included in your subscription series and click on Modify.
In the Event maintenance window, make sure you have checked the box which says Season ticket event.
From the main menu bar, select

Click on the New button.
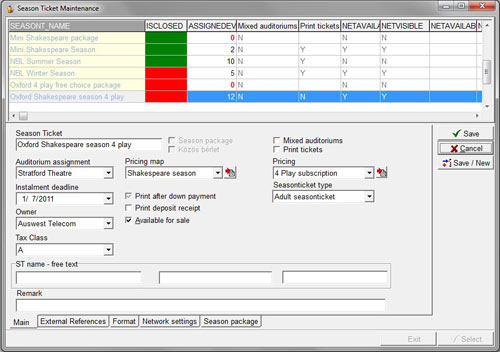
In the Season ticket field, type a name for the Season Ticket you wish to create.
If the subscription series includes events held in different auditoriums/venues, check the Mixed auditoriums box.
If this box is checked, you MUST go to the Connect Charts section to connect the seat numbers for the different venues before making the tickets available for sale.
Check the Print Tickets box if you want individual tickets to be printed for each event in your season – otherwise a single group ticket only will be printed listing all the events in the season.
From the Auditorium assignment field, select the auditorium/venue.
From the Pricing map drop-down dialog box, select a Pricing map.
Ensure that the Available for sale box below is unchecked otherwise you will not be able to create any new Pricing Map or Pricings.
You will also not be able to Modify the Season ticket name if the Available for sale box is checked.If required, an existing Pricing Map can be modified or a new one created by selecting the button to the right of this box.

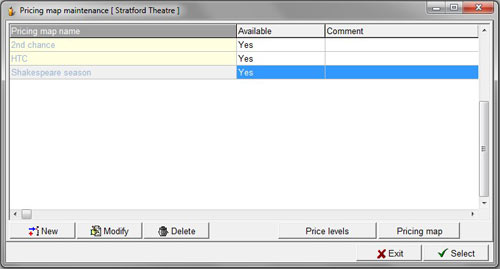
To create new Pricing Map for your season, click on the New button.
The Pricing Map Maintenance window will open.In the Pricing map name field, type in a name for your season pricing map.
Click on the Save/New button if you wish to save and create further pricing maps or Save to create just the current pricing map.
In Pricing map maintenance click on the Price levels button and the Price category maintenance window will open.
Click on the New button.
In the Price level name field, type a name for your price level such as “Front Stalls”, “Main” etc. Click on the light globe icon at the right of the Price level colour field and a colour chart will appear.
Choose a colour which you will use to colour in the seats on your Pricing map to easily identify this particular price level.
Click on the Save/New button if you wish to enter additional Price level names or the Save button if this is the only Price level name you will be entering for this auditorium.
Next you must make the Pricing map you have just created available for use.
Select the Pricing map name from the Pricing map maintenance window, then click the Modify button.
Check the Available box so that the tick mark is showing in black and not light grey.
Click the Save button.
In the Pricing map maintenance window, the pricing map should now have “Yes” showing alongside it in the Available column.
Back in the main Season Ticket maintenance window, go to the Pricing field and select a pricing schedule from the drop down list.
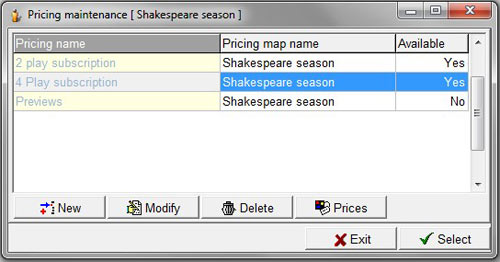
A new schedule can be created (or an existing schedule modified) by selecting the button to the right of this box.

Click on the New button.
In the Pricing Name field, type in name (e.g. Preview)
Click the Save/New button if you wish to enter additional Pricing Names or the Save button if this is the only Pricing Name you will be entering. You will then be returned to the Pricing maintenance window.
Do not click the Accept button just yet as you still need to set up the base prices that are associated with each Pricing Name.
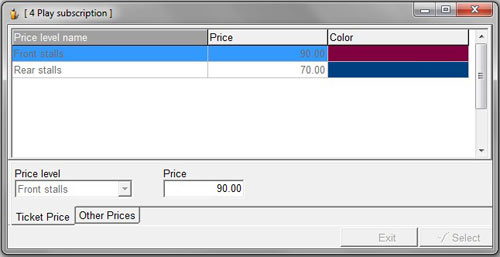
Highlight the Pricing Name for which you wish to set prices and click on the Prices button.
Click on the New button.

Highlight a Price Level Name and click on the New button.
In the drop-down Price level name box, select a named price level.
Enter the base price that applies to this particular Price Level in the Price field.
Click the Save/New button if you wish to enter additional Price level name and Prices or the Save button if this is the only Price level name and Price you will be entering.
When you have finished entering all the Price level name and Prices, click on the Accept button.
At this point, to enable any or all of the Pricing names you have just created, highlight the pricing name you wish to enable, hit the Modify button, then check the Available box.
NOTE: Make sure that the Available check box is ticked and that the price names are shown as Enabled otherwise you will not see the Pricing name in the Pricing drop down box in the main Season Ticket Maintenance window.
Click on the Save, then the Accept buttons.
From the drop down calendar on the Installment deadline box, enter the date by which full payment must be received where a deposit has been taken to secure a ticket reservation.
Check the box Print after down payment if you want to allow the tickets to be printed after a Patron has only paid a deposit for the tickets being purchased.
Check the Print deposit receipt box if you want a receipt to be printed for payments made.
From the Seasonticket type drop down box, select Adult seasonticket.
If you don't select this entry, you may get an error message saying “Database connection error non-nullable column: cannot be updated to null”.
Check the Available for sale box to make the tickets available for sale to ticket sellers and on the web (if set under Network settings).
In the ST name - free text fields, (optionally) enter any text you wish to appear on the season ticket - up to 36 characters in each box. This text will appear on separate lines on the ticket.
In the Remark field, enter any reference you wish to add (not printed on tickets).
Click on the Network settings tab to set up when Season Tickets will be visible on the network and available for sale. (see Maintenance > Season Tickets > Season Ticket Maintenance > Network).
Click on the Format tab to set up default ticket formats.
(see Maintenance > Season Tickets > Season Ticket Maintenance > Format).
When finished setting up Network setting and Formats, click on Save to exit or Save/New if you wish to set up additional Season Tickets in this session.
The next step is to select and assign the events to be included in a Season Ticket.
(Go to Maintenance > Season Tickets > Season Ticket Maintenance> Events)

