Season Tickets
Events
Select the events to be included in a Season Ticket (this section is not applicable to Season Packages which are set up under ).
From the main menu bar, select
Highlight a Seasonticket name and click on the Events button.
NOTE: If the Events button is a greyed out box, it means that Available for Sale has been checked in page so you need to uncheck this box until your events have been set up.

Select the Season from the Season drop down box at lower right.
NOTE: Only the events in the chosen season will be displayed in the next step where you select the events to be included.
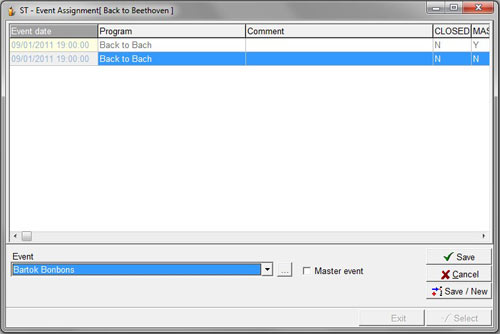
Click on the New button.
From the Event drop down box, select the first event to be included in your season.
If a particular event you want in your series is not listed, click the button to the right of the Event box to bring up the Event Maintenance window.
Highlight an event, hit Modify and check to see that the Season Ticket Event box is checked.
Check the box and click the Save button.
Back in the t window, highlight an event and click on the Modify button.
Check the Master Event box (if not already checked).
Checking the Master Event box makes the seating chart that is attached to this event the Master seating chart for all the events in the series.
The Master Event seating chart is used when seats are selected for Season Ticket sales.
The system then attempts to allocate the same seat/row number for all events within the specific season. If it is unable to do this, then it cannot create a season subscription.
If the identical seat number is not available across the complete series being selected, you must choose a different row/seat or you could manually sell a season subscription by selecting unsold seats from each of the events in the named series and use a predefined discount schedule to set the pricing to apply for the appropriate number of seats sold in the series.
Click on Save/New to add extra events in your season.
NOTE: When adding events, make sure that for all events selected:
a. the same printer and ticket formats are selected under the Ticket Printing tabContinue selecting events to fill the specific season, clicking on the Save/New button after each entry.
b. the same Season is selected for all events
c. the Season ticket event checkbox is checked
d. the events are all General Admission or all Reserved seating
Do not check the Master Event boxes for any subsequent events.
When you have finished selecting all the required events in the season, click on Save.
If you make an error in selecting an event or accidentally select an event twice, click on the event you wish to change, click on Modify and select the required replacement event.
Click on Save and a pop up box will appear asking "This event is assigned to Season Ticket xx xxx xx ? Save?".
Click on Yes and the replacement event will be saved in the event list.
Click on the Activate button and then the Accept button.
In the main Season ticket maintenance window, highlight the season you are working on, click on Modify and then check the box Available for Sale.
The Closed column opposite the Season ticket name will change from green to red.
Click on Save and then click on Accept.
NOTE: If you omit this last step, you will not see the season showing when you attempt to sell season tickets.
When finished selecting events, make sure to go back to the main Season Ticket Maintenance window for the selected event and ensure the Available for Sale checkbox has been checked.

