Programs
Price Levels
A Price Level is a named area in your auditorium/venue in which a specific set of prices apply e.g. Front Stalls, Rear Stalls, Balcony etc.
Separate Price Levels can be applied to any area of your seating chart, independently of any Sections that may have been set up.
NOTE: You MUST set up named Price Level(s) even if you have only one section in the Auditorium.
If you don't do this, you will not be able to set your base ticket prices.
From the main menu bar, select
Click on the button to the right of the Pricing map field which will bring up the Pricing map maintenance window.
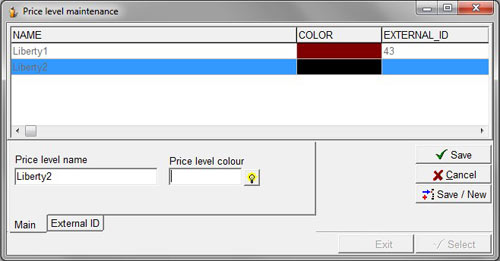
Click on the Price Levels button. The Price level maintenance window will open.

Click on the New button.In the Price level name field, type a name for your price level such as “Front Stalls”, “Main” etc.
Click on the light globe icon at the right of the Price level colour field and a colour chart will appear.
Choose a colour to easily identify the seats in this particular price category on your seating chart.
Click on the Save/New button if you wish to enter additional Price level names or the Save button if this is the only Price level name you will be entering for this auditorium.
NOTE: If setting up Price Levels in General Admission events, the Price Level name you choose is used by default when setting up base Prices.
When you are finished entering all the Price level names, click on the Select button
NOTE: Take care when setting up Price Levels since you cannot delete a Price Level you have created it.
You can only check or uncheck the Available box in Pricing map maintenance to make it available or unavailable.
You can however change the name of the Price Level by clicking on the Modify button.
Setting the Price Levels for the auditorium
a. Setting Price levels on a Seating chart
From the Pricing map maintenance window (), click on the Pricing Map button.
The seating chart will now appear on your screen.
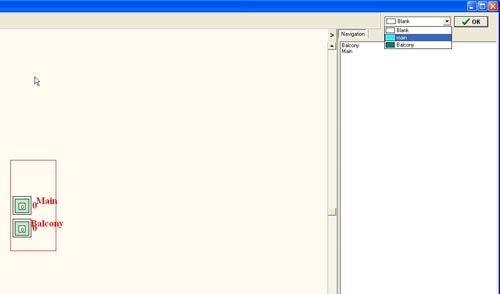
From the drop-down box at the top right above Navigation select a Price level that you have previously set up.
Using your mouse, draw a box around the section in the auditorium where you want this particular price level to apply.
You can also individually select seats by clicking on the seat once with your mouse.If you make a mistake and incorrectly select any seats, select the price level you wish to apply to those seats and click on the seats with your mouse (or draw a box around them if it is a block of seats).
When you are finished selecting all seats in the different Price Levels, click the OK button.
Click on the Accept button in the Pricing map maintenance screen which will bring you back to the program maintenance screen.
b. General admission seating – no Venue map
From the Pricing map maintenance window, click on the Pricing Map button.
On the Pricing map window, you will see a rectangular box outlined in red, together with one or more additional boxes corresponding to Sections you have previously set up.
NOTE: If you do NOT see any small boxes with Sections showing but you have set up Sections correctly under Maintenance >Auditoriums > Sections, you may need to firstly log off the system and then log back in again.

From the drop-down box above Navigation at the top right, select a Price level and draw around the box or click on the center of the box to assign the Price level to the required Section.
The center of the box will change color corresponding to the Price level selected.
If you have set up additional Sections which appear in the Navigation pane, click on each Section name in turn to apply the Price level to each Section.
Click on the OK button when you have finished.
Click on the Accept button in the Pricing map maintenance window which will bring you back to the Program maintenance window.
You now need to set the Pricing applying to the program you have just entered before you can save any entered information.
Go to Maintenance > Program > Pricing field.

