Season Tickets
Setting up Season Subscriptions - Season Packages
The basic steps for setting up a Season Package where the customer can choose from a specified number of events within the defined season, is similar to setting up fixed event Season Tickets, except for choosing the events to be included.
Also with Season Packages, there is no option for reserving a Season Package by paying a deposit.
From the main menu bar, select
Click on the New button.
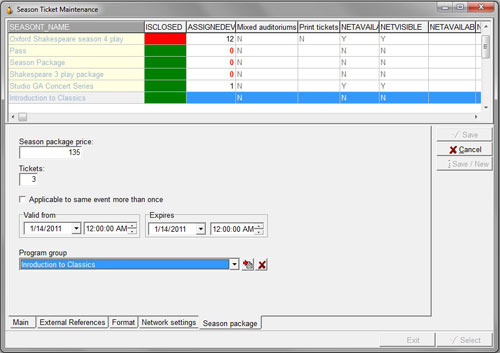
In the Season ticket field, type a name for the season package you wish to create.
Check the Season Package check box.
Click on the Season Package tab.

Enter the price of your season package ticket in the Season Package Price field.
in the Tickets field, enter the (max.) number of tickets that can be issued with this season package.
Check the Applicable to same event more than once check box if you wish to allow a customer the option of attending the same event more than once. (Attending the same event more than once will count down the number of remaining events customer can attend).
Set the period to which the season package is to apply from the Valid from and Expires drop-down calendars.
From the drop-down Program group box, nominate the events to which the season package will apply by selecting an existing program group.
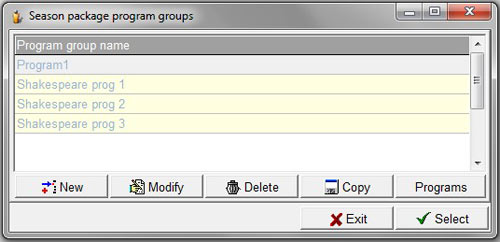
If no Program groups are displayed or you wish to create a new program group, click the button with the red arrow to the right of this field.
The Season package program groups window will appear.

Click on the New button, enter a name for your new Program group in the Program group name box then click on Save.
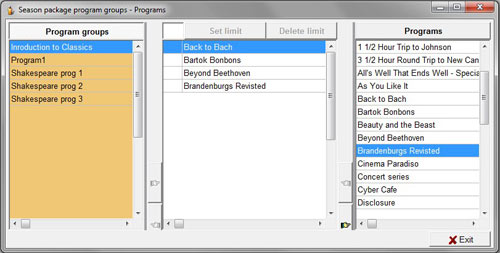
The Season package programs group – Programs window has three panes.

From the left-hand pane, highlight the Program group you are working on to select.
From the right-hand Programs pane, click on the left facing hand to add events you wish to include in this particular package.
To set a limit on how many times a customer can attend a specific event in this middle pane, highlight the specific event, enter the max. number of tickets alongside the Set limits button, then click on the Set limits button. The maximum number of tickets permitted will now show alongside the specific event.
To remove the limit, highlight the event and click on the Delete limit button.
You can remove any events from the central pane by clicking on the right facing hand.
When finished, click on the Exit button.
Back in the main Season ticket maintenance window, from the Seasonticket type drop down box, select Adult seasonticket.
NOTE: If you don't select this entry, you may get an error message saying “Database connection error non-nullable column: cannot be updated to null”.
In the ST name - free text fields, (optionally) enter any text you wish to appear on the season ticket - up to 36 characters in each box. This text will appear on separate lines on the ticket.
Select the “Formats” tab to set the type of printer to be used and the format of the tickets which will be printed either online or offline.In Remarks field enter any reference you wish to add (not printed on tickets).
The final two steps are:
Set up when Season Tickets will be visible on the network and available for sale - click on Format tab
Set up default ticket formats and ticket printers - click on Network settings tab.
For detailed instructions, go to Maintenance > Season Tickets > Season Ticket Maintenance > Network and Maintenance > Season Tickets > Season Ticket Maintenance > Format.
When finished setting up Network setting and Formats, click on Save to exit or Save/New if you wish to set up additional Season Tickets in this session.
Before you have finished, make sure that the Available for sale box has been checked to make your Season Package available for sale.

