Customers
Send emails to your Patrons informing them about upcoming events and include additional messages as required.
From the main menu bar, select
NOTE: If you are using this email function, you must firstly enter the details of your email account, server name, port, user name and password in Maintenance > Venue > Email settings. The text entered in the Email subject field will become the heading of your email sent through the email function in Customer maintenance.
From the Customer maintenance window click on the Email tab.

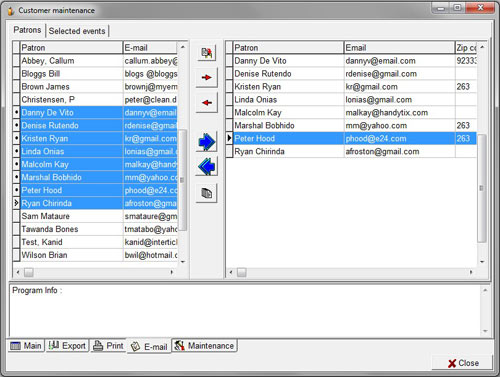
The customer maintenance window will open up with tabs showing at the top left for Patrons and Selected events.
In Patrons window, you select the list of patrons to whom you wish to send e-mails.
NOTE: Only Patron names will appear in the left hand column. For a name to appear in this list, the customer must have been specifically designated as a Patron by checking the Patron box in Customer maintenance > Options tab.
If you want all (future) customers whose details are entered in the administration side of the program to be designated as "Patrons" by default, go to and ensure the Patron checkbox is checked.
If you require all customers purchasing tickets via the network (web) also to be designated as Patrons by default, please contact InterTicket customer service.
Click the → arrow to place patron's name individually into the right-hand side column or alternatively click on the large blue arrow to place all Patron names in the right hand box.
To select multiple names, hold down your Ctrl key and click on the required Patron names, then click on the icon below the blue arrows to transfer the names to the right-hand side column.
Note that you cannot use this alternative method for deleting names in the right-hand side column - you must remove each name individually using the small red arrow button or remove all the names at the same time with the large blue Arrow button.
If you decide you wish to remove any of the names click on the name and then the ← arrow.
If you want to remove all the names from the e-mail list, click on the left facing blue Arrow.
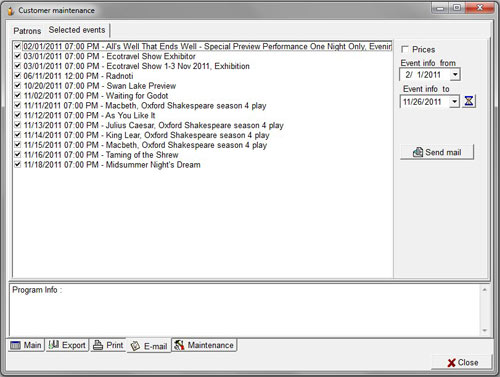
Click on the Selected events tab.

Check the Prices button if you wish to include detail about the ticket prices in the emails.
Select the date from which you want to show events (and prices) by selecting a date from the drop down calendar in Event info from box.
Select the end date from which you want to show events (and prices) by selecting a date from the drop down calendar in Event info to box.
Click the hour glass icon to generate the list of selected events (and ticket price information if selected) in the left hand panel.
Note that you must always hit the refresh button after you have checked the prices box or have changed any of the date selections.
Check the box alongside each event for it to be included in the information sent by email.
In the bottom text box, you can type in any new text you wish to be included in the emails.
NOTE: The only information that will appear in the body of your e-mail is the information in the top panel proceeded by the phrase "Program Info:" unless you enter further information in this text box.
For example you may wish to add a salutation such as Dear Patron, and also add additional text, explaining the information in the e-mail, the reason for the e-mail or any other information you wish to give to your patrons.
Information about Selected events will be entered below any information you enter in this box so if you wish to include a sign off signature you would need to enter text something like as follows. Make sure you leave space under the last line you write by hitting Enter once or twice, otherwise the inserted Selected events information will immediately follow any text you write.
Dear Patron,
We would just like to keep you up-to-date with our current program. You'll see the remaining performances in our current season below.
We look forward to your company at our forthcoming events.
With warmest regards,
John Jones
Theatre Manager
If you want to send a customized text message with NO information about upcoming events and prices, then uncheck ALL of the boxes alongside the list of events. But make sure there is at least one event displayed in the Selected events listing (even though it is unchecked) otherwise you will receive an error message when you attempt to send your email.
To send your email, click on Send mail
(if you don’t select any event names or include personalized text, an error box will pop up saying "Tickets 2007 No data selected!" )
If your emails were sent successfully, a pop up box will appear saying Mail(s) sent successfully.
TIP: If you wish to keep a record of e-mails that you send, enter your personal details in the customer database with your e-mail address, designate yourself as a Patron, and include your e-mail address in the list of Patrons to whom you are sending e-mails.

