Programs
Pricing Map
A Pricing Map is the main seating chart which has been divided into different Price levels i.e. regions where you wish to charge different ticket prices. Whilst typically this might correspond to different named Sections of your auditorium such as Orchestra, Circle, Balcony etc. this is not necessarily the case, as you could for example have different Price levels within a single Section. e.g. different prices applying to seats in the front, middle and rear of a balcony Section.
NOTE: You DO NOT set up base prices or special (modified) prices such as Student, Concession, Senior etc. in the Pricing Map section of Maintenance > Programs . Base prices are set in Maintenance > Program > Pricing > Prices and modified prices are set in Maintenance >Rates > Rate.
If you are selling general admission tickets and not using a seating chart, you still need to create a Pricing Map.
In this case however, the Price levels will simply be displayed on the Pricing Map as rectangular boxes.
If you want to set up your auditorium (where a seating chart has previously been created for you) so that some sections are general admission and other sections are reserved seating, then you need to go to Maintenance > Auditoriums, select the Auditorium, click on Sections tab, select the section where you wish to sell general admission tickets from the Section Name field, select Modify and check the General Admission box.
To set up your Pricing Map, from the main menu bar, select Maintenance > Programs > Pricing Map
If there are no names visible in the Pricing map drop down box or if you have not created a Pricing map already for this particular Auditorium/Program, then you will need to create a new Pricing Map by clicking on the button with the red arrow at the right side of the box.
If you want to Modify an existing Pricing Map, also click the button with the red arrow at the right side of the box.
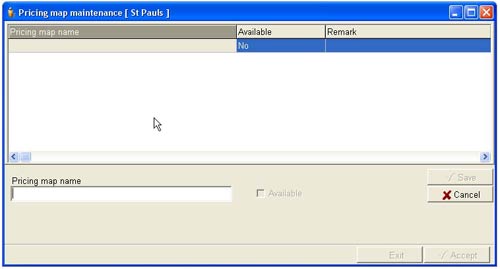
After clicking on the button with the red arrow at the right side of the Pricing map name field, the Pricing map maintenance window will appear.
If you wish to change any existing data, click on the Modify button if you wish to set up a new Pricing map, click on the New button.

In the Pricing map name field, type in a unique name for your pricing map to apply to this auditorium.
Note that this name is just the overall name of the pricing map you are creating - its is NOT the names of the individual pricing zones which you will create later as Price Levels.
So typically you might just give this pricing map the same name as your auditorium.
Click the Save button.
Next you must make the Pricing map you have just created available for use.
Select the Pricing map name from the Pricing map maintenance window, then click the Modify button.
Check the Available box so that the tick mark is showing in black and not light grey.
NOTE: You must only set ONE Pricing map as Available for each Program.
Any other Pricing maps you have created must be set as unavailable.
Click the Save button.
In the Pricing map maintenance window, the pricing map should now have “Yes” showing alongside it in the Available column.
The next step is to set up your Price levels (zones where your different price levels will apply) and then assign these Price levels to areas on your Pricing map.
Go to Maintenance > Programs > Pricing Map > Price Levels.

