Ticket Transactions
Reserve Tickets
Reservations enable seats to be blocked from sale to others until the customer decides to purchase the seats.
An auto release date can be set which automatically releases the seats for resale if not fully paid for by the nominated release date.
The default release time is set by venue (Maintenance > Venue > Modify) but the default setting may be changed for each ticket.
The system does not have provision for accepting a deposit at the time a reservation is made.
From the main menu bar, select
The Browser window will open.
Select the event and go to the seating chart or use the Quick ticket button.
Select the required seat(s).
When finished selecting seats, click on the OK button in top right hand corner to add the selected seats to the Shopping Cart.

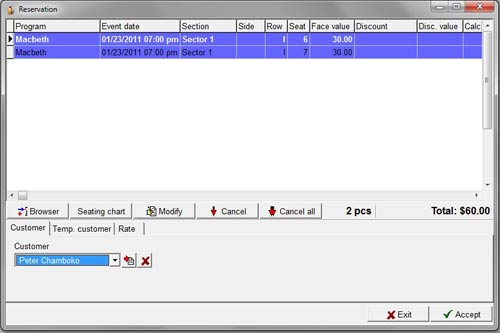
If you wish to apply modified Rates to the tickets and/or change the default release date, click on the Modify button to open the Modify Window.
If you wish to apply the same Rate to all tickets displayed, check the All tickets check box.
When you have finished modifying Rates and/or Release dates click on the Save button.
Note that if you want to modify or change the release date of a specific ticket, you must select the required ticket in the Cart before clicking on the Modify button.
When the Modify Window opens, uncheck the All tickets checkbox.To set a new Release time, select the date and time from the drop down calendar and clock.
Click on the Save button.
Select a customer from the Customer drop down list.
If the customer is not listed, click the button with the red arrow at the right of the drop down box, and you will be transferred to Maintenance >Customers, where you can enter details of your new customer.
Click on the Temp. customer tab if you want to only temporarily register the customer's name and address for the purposes of making a reservation.
The system will then remove the customer's details from the customer database automatically if the reservation is subsequently released back for resale and not purchased by the customer.
None of the fields in Temp. customer are required, but you must enter data in at least one.
The customer will be temporarily registered in the Customer database and will automatically be removed as soon as the reservation is released.
However if the reserved seats are printed, the customer data will be automatically registered permanently.
Click on the Accept button to complete the transaction.
The seats will turn blue in the seating chart (Reserved status) and the reservation number will be displayed.
Reserved seats can be searched by customer name or reservation number.
To print or to release reservations, go to Ticket transactions > Sell/Release Reserved Tickets.

