Ticket Transactions
Mail Out Tickets
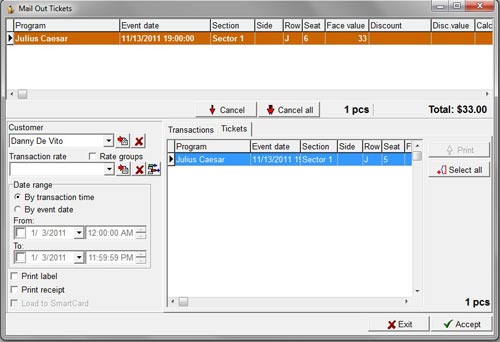
Enables the on demand printing of tickets where you have checked the Mail out checkbox when selling tickets signifying that you will be mailing the tickets later to the customer.
From the main menu bar, select

Select the Customer whose tickets you wish to mail out from the drop down list.
The list returns only those who currently have mail out tickets for any event.
If the Transactions tab is selected, click on an event name to select the event for which tickets are to be mailed or Select all to select all events/tickets in the list.
Click on the Print button to move the selected events/tickets to the upper panel.
OR
To display the list the tickets with row /seat number for any event, click on the required event, then click on the Tickets tab.
To select more items, press Ctrl on the keyboard and click on the transactions/tickets.
Click on the Print button to move the selected events/tickets to the upper panel.
Double-clicking on a ticket will also automatically select it and add it to the upper window for printing.
To remove a ticket from the list, select the ticket and click on the Cancel button.
To remove every item from the list, click on the Cancel all button.
You can filter by transaction time or by event date.
Check the required option with the By transaction time or the By event date radio buttons and use the drop down calendars to set the date range.
Check the Print label box to print an address label if required.
Make sure the correct format for address labels has been set up under Maintenance > Report formats > Label formats-tickets.
Check the Print Receipt box to print a receipt immediately after the tickets are printed.
Click on the Accept button to print the tickets.

