Settings
Printer Setup
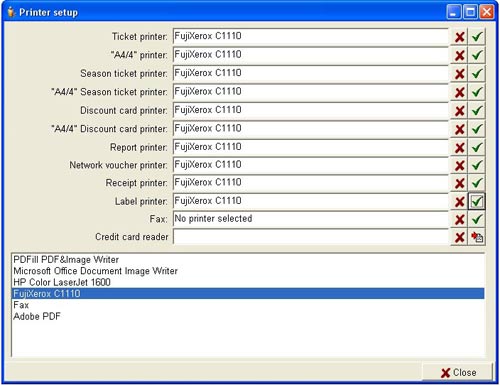
Set the default printers to be used for printing tickets, receipts, gift cards and labels.
You can set a different printer to print each item if you wish.
So for example you could print single tickets on a thermal ticket printer and gift cards on a laser printer.
From the main menu bar, select

In the lower box, highlight the printer you wish to associate with any of the listed printer options, then click on the green tick button to associate the printer.
Click on the button with the red cross to cancel a selection.
If no printer is selected, then the item (ticket, gift card etc) will be printed by your default Windows printer.
To set up a swipe card reader for credit cards, click on the icon to the right of the Credit card reader box and a new dialogue box will open.
Make sure your card reader is attached to a USB port on your computer, select the card reader from the drop down list and click Set.
When selecting a card reader, please ensure that it is a HID (Human Interface Device) type and not a keyboard wedge type - such as MagTek MiniUSB HID Swipe Stripe Reader. One of the advantages of using a HID (Human Interface Device) type swiper is that you can swipe the card any time, even when you are not in the credit card data input window.
Optional printer settings
A. You can eliminate the dialogue box “Please check there is enough paper….” when using a sheet printer (laser or inkjet) if you type a4/4info immediately after you have logged in.
Just type these letters anywhere - you won't see them being typed. This setting will now be effective whenever you login in future.
B. To avoid the Print Preview screen appearing when using a sheet printer and instead send the tickets directly to the default printer, go to the configuration file Tickets.ini in the folder where you saved the program files.
Open this file with a text editor such as Notepad and look up the following setting:
PRINTTICKETTOSCREEN =1
Change this setting to:
PRINTTICKETTOSCREEN =0
Click on Save to save the new setting.

